February 24, 2009

New Orleans ain't so proud of me....

So the other day when I told you about the amazing fig cake, I neglected to mention the disaster that was the beginning of that meal. A little embarrassing considering we had company over (don't worry, they are good friends and are always given a fair warning that they will be used as guinea pigs). Most of my friends up here have never really had good southern cookin', so when given the chance, I like to introduce them some of my favorites. Since today most of the southern world will be spilling out huge pots of gumbo, I thought this would be the perfect time to share with you my own gumbo experience, and hope that yours will go much better! :)

I should go ahead and let you know that I really have no credentials to be cooking southern food, except for the fact that I've eaten my fair share. I grew up in north Florida, which is a combo of traditional southern types but also a lot of beachy, typical Florida people. Mom is from Tampa & Dad is from the backwoods of North Carolina. So I guess that heritage makes me half qualified. I didn't really get into my "southern roots" until I spent 4 glorious years in the wonderful town of Oxford, MS. People, you just don't get more southern than Ole Miss. If you've never been down there, I suggest you pull up next year's football schedule and book a ticket. You will be happy you did.

Anyways, I've already introduced the majority of my yankee friends (my husband was actually dubbed a "super yankee" by my best friends since he is from Canada) to things like biscuits and gravy and red beans and rice, but I thought I would do something a little more intense for dinner the other night. In the spirit of Mardis Gras, I decided to make a chicken-andouille sausage gumbo.

First off, I had to take apart a whole chicken - which I have no idea how to do. Good thing the chicken was just shredded to bits in the end because it was looking a little scary by the time I was done attempting to butcher it. I boiled the chicken down, creating a really nice stock, and then things began to get a little crazy. The recipe called for cooking oil and flour until it turned a dark caramel color. Well in about half the suggested time, mine had turned totally black (see the picture!). Ooops. Everything else went fine, but this black gunk made the whole dish taste bitter and slightly oily. It also stuck to everything and made for a serious clean-up session.

It's so disappointing when something so labor intensive and promising turns out like this. But I wanted to share since experiences like this, although unpleasant, are just part of learning to cook. Guess I have to get a little more in touch with my southern roots before I try something like this again! I'm not going to post the recipe, because at this point I don't know if it was me or it that caused the debacle, but if you would like it please let me know and I would be happy to add it for you. The one good thing that did come out of this meal, aside from the wonderful company, was some great made-from-scratch cornbread that I will share with you soon!

Hope everyone gets a big slice of King Cake today served up along side of a Hurricane (and no hangover tomorrow)!

February 20, 2009

The Vanishing Cake....

This cake rocks my world. It is sooooo good! This is the second time I've made it, and I'm telling you people, it is awesome. I'm surprised it even made it into the cake pan because I kept eating the batter! I made this one night when Pete and Dana came over for dinner, and they loved it as well. Between the four of us, this whole cake went up in smoke in less than a day. One day! Oh, my poor hips.

The cake is so moist and delicious, with bites of gooey fig jam and a to-die-for buttermilk frosting that seeps through the whole thing. Yes, the fruit and milk combo makes this a perfectly acceptable breakfast item. If it makes it to the next morning that is. And of course, it only gets better the longer it sits around.

Did you know that if you are out of buttermilk, you can substitute by combining 1 tablespoon of vinegar or lemon juice and 1 cup of milk and letting it stand for 10 minutes? I bet you knew that already. I learned this while reading this recipe about a year ago and it has been one of my go-to tricks ever since. 

Pecan Fig Cake with Buttermilk Glaze

Cake:
3 eggs
1 1/2 cups sugar
1 cup oil
2 cups AP flour
1 teaspoon ground nutmeg
1 teaspoon ground allspice
1 teaspoon ground cinnamon
1 teaspoon salt
1 teaspoon baking soda, dissolved in a little bit of hot water
1/2 cup buttermilk
1 teaspoon vanilla extract
1 cup fig jam or coarsely chopped preserved figs
1 cup pecans

Buttermilk Glaze:
1/2 cup buttermilk
1/2 cup sugar
1/4 cup butter
1 1/2 teaspoons cornstarch or flour
1/4 teaspoon baking soda
1 teaspoon vanilla extract

Cake:
  • Preheat oven to 350℉.
  • Butter and flour a 10-inch tube pan.
  • In a large bowl, beat eggs for a few minutes or until they become light yellow and smooth.
  • Add sugar and oil and beat well to form a smooth, thick batter.
  • In a separate small bowl, sift together the flour, nutmeg, allspice, cinnamon and salt.
  • Add 1/2 flour mixture to egg batter and stir with a large spoon to combine.
  • Add buttermilk. 
  • Add remaining flour mixture, baking soda and vanilla extract, stirring to combine.
  • Gently stir in figs and pecans, just mixing till evenly distributed.
  • Scrape batter into prepared pan and bake for 40-50 minutes, or until the cake is browned, firm on top and a wooden skewer inserted in the center comes out clean.
  • Cool cake in pan on top of a wire rack for 15 minutes.
  • To remove, run a table knife around the pan and gently turn the cake out.
Glaze:
  • Prepare glaze while the cake bakes.
  • In a medium saucepan, combine the buttermilk, sugar, butter, cornstarch and baking soda, and bring to a gentle boil.
  • Remove at once, stir well and set aside to cool to room temperature.
  • Stir in vanilla.
  • Once cake has slightly cooled, pour glaze over top. If desired, poke small holes in the cake so that the glaze can run inside. (I actually did this while the cake was still in the pan, which made the glaze on the bottom of the cake. Still delicious and less of a mess!).

February 18, 2009

Beef and Butternut Squash Stew

The weather is so sneaky. It had just barely started to warm up here last week, and now it's back to freezing again. After spending a few days in sunny Orlando, I was beginning to think that winter might just be heading out the door. Ha! It doesn't look like the coldness will be leaving us anytime soon. Plus, we are headed back up to Toronto this coming weekend, so I have a feeling we will be getting more than our fair share of winter weather.

The one (and pretty much only) good thing about the chilly weather is that you get to sit in the comfort of your heated home eating soul satisfying soups and stews. That's exactly how I plan to cope the next few months. So I decided to give another one of Giada's soup recipes a try after my last attempt didn't go so well. I've had this bookmarked for forever and am so glad that I finally tried it. It is very hardy with big, beautiful chunks of butternut squash. The sweet squash, savory meat, tangy sun-dried tomatoes and herb combo make for a very unique flavor. This dish just feels special because of how many layers of flavor it has. You would never know that it was easypeasy to whip up. This is also pretty economical for those of you who aren't so sure the stimulus bill will pull us out of this funk.


Beef and Butternut Squash Stew

3 tablespoons olive oil
1 onion, chopped
2 garlic cloves, chopped
1 tablespoon fresh rosemary, minced
1 tablespoon fresh thyme, minced
2 pounds of stew beef, cut into 2-inch cubes
1/2 teaspoon salt
1/2 teaspoon pepper
2 tablespoons AP flour
1 cup Marsala wine
1 pound butternut squash, peeled and cut into 2-inch cubes
1/4 sun-dried tomatoes, chopped
3-4 cups beef broth
2 tablespoons flat-leaf parsley, chopped
rice, optional
  • Heat olive oil over medium heat in a large soup pot.
  • Add onions, garlic, rosemary and thyme and saute for about 2 minutes, or until the onions have begun to soften.
  • Toss beef with salt, pepper and flour, then place in pot over medium-high heat.
  • Cook beef until browned, about 5 minutes.
  • Add wine, and using a spoon, stir-up the browned bits on the bottom of the pot.
  • Add squash and tomatoes.
  • Add just enough broth to cover the squash.
  • Bring to a boil, then reduce to a simmer, cover and cook for 1 hour.
  • Adjust salt and pepper to taste, garnish with parsley and serve over rice, if desired.

February 13, 2009

All my Single Ladies!

Being single on Valentine's Day, well, stinks. Everyone is all lovey dovey and on crazy sugar highs, and the single people are for the most part neglected in all the hooplah. Seeing as I have lots of beautiful, smart and just downright amazing single friends (oh, you know who you are!), I thought I would post something just for them for Valentine's Day.

It is very rare for me to cook for just myself. If Brad is out on work and I'm alone for a night, I usually grab for the nearest box of cereal and pray that the milk hasn't gone bad. It all comes down to not really wanting to put the effort into making something and then dealing with the clean-up when it's just for me. Well, sometimes you are worth this extra bit of effort, and Valentine's is no exception!

So here's a dish I found that is made for one very hungry guy or gal (or you will have some nice leftovers for lunch the next day). It's just as simple as reaching for the blue Kraft box, but so elegant and delicious, and it only dirties one pan. Winner! So to all of you without plans on Saturday, make this pasta, light some candles, open a bottle of wine and enjoy it all just for you. Cause baby, you're worth it! (No, I'm not endorsing a makeup company here...)


Pasta Fake-Bake

salt
1/4 pound penne pasta
1 tablespoon EV olive oil
1 tablespoon butter
2 shallots, finely chopped
1 garlic clove, finely chopped
1/2 cup frozen asparagus (or peas, broccoli, etc.)
black pepper
1 teaspoon lemon zest
1 tablespoon fresh thyme, finely chopped
1/2 cup ricotta cheese
1/4 Parmesan cheese, grated
red pepper flakes
  • Preheat Broiler.
  • Bring a pot of water to boil on stove, salt the water and add the pasta, cooking to al dente.
  • Drain pasta and reserve 1/3 cup of the pasta water.
  • In a medium skillet over medium heat, add the butter and EVOO.
  • Add shallots and garlic and cook 3-4 minutes.
  • Add asparagus and cook another 2 minutes.
  • Add salt and pepper to taste, lemon zest and thyme.
  • Add pasta, ricotta and pasta water and toss to combine.
  • Top with grated Parmesan.
  • Place skillet under broiler for 3 minutes, or until top is slightly browned.
  • Add red pepper flakes, if desired, and enjoy!

February 10, 2009

Sweets for your Sweeties!

People seem to feel very strongly about Valentine's Day. Either they love it and get totally into it Martha Stewart style, or they think it's just Hallmark propaganda and boycott the holiday entirely (and share these feelings with any one within yelling range). Personally, I think I fall somewhere in the middle. I appreciate the holiday as a day to express to the ones you love how much they mean to you. We often get lost in the shuffle of our everyday lives, so why not take a minute and recognize those you love. This is not limited to only your main squeeze of the moment, but also to your family and close friends. Everyone appreciates a little card with a cute message! 

I don't, however, think this needs to be done with elaborate handmade crepe paper valentines or expensive gifts. Brad and I still feel like we are coming off the Christmas giving spree, so we rarely give gifts for Valentine's. Instead we opt for cards and food. We usually go to a nice dinner and spend the night drinking wine, eating great food and being sure to order something chocolatey and sinful for dessert. This year, we are actually upping the anti and taking a weekend trip to Disney! Wahoo! As a person who spent 18 years of her life never more than 2 hours away from the most wonderful place on earth, I'm looking very forward to revisiting with Mickey.

But getting back to my point that Valentine's is not solely limited to your honey, why not make a treat that can be spread around, instead of making a fancy chocolate souffle that will only cover one person on your "I love" list. Why not make mini-cupcakes that are decorated in a Valentine's motif?! Kitchy, yes. But it's the holiday people, work with me.

These little beauties are so delicious - moist and dense with a subtle sweetness and chocolate flavor that is only found in a truly special southern red velvet cake. And the frosting, oh the frosting. Cream cheese. I think it speaks for itself. I only used 1 tablespoon of red food coloring so my cakes came out a little pinkish instead of red, but still very festive. I also topped each one with Valentine's M&M's. These went to various places and people I had some of the best responses to these I've ever gotten. Go ahead - show 48 of your friends that you love them with these suckers and see if you don't at least get some candies and kisses in return.


Red Velvet Mini-Cupcakes
Adapted from How Sweet It Is Bakery - Ellen Sternau and Beth Pilar
Yields 48

Mini-Cupcakes:
1 1/2 cups granulated sugar
2 1/2 cups cake flour
2 tablespoons cocoa powder
1 teaspoon baking soda
1 teaspoon salt
1/2 cup vegetable oil
1 cup buttermilk
2 large eggs
1-2 tablespoons red food coloring
1 teaspoon vanilla extract
1/2 teaspoon vinegar

Cream Cheese Frosting:
8 ounces cream cheese
1/2 pound unsalted butter, room temp.
2 cups confectioners sugar
1 1/2 teaspoons vanilla extract 
Valentine's M&Ms or other appropriate decorations
  • Mini-Cupcakes: Preheat oven to 325℉ and line two mini-cupcake pans with wrappers.
  • Mix all dry ingredients together and all wet ingredients together in 2 separate bowls.
  • Pour wet into dry ingredients and stir just until combined.
  • Immediately pour mixture into tins, filling about 2/3 of the way full.
  • Bake for 15-20 minutes, then cool completely.
  • Frosting: Mix butter and cream cheese until smooth.
  • Slowly mix in confectioners sugar and vanilla extract.
  • Place frosting in a piping bag (I used a star-shaped tip), and frost as desired. Or frost using a spatula.
  • Top with decorations.

February 8, 2009

Italian Wedding Soup

I love the canned Italian wedding soup you can find at any grocery store. The mini-meatballs, bits of pasta and flavorful blend of herbs are an awesome combination. So when I saw Giada making this soup, I knew I had to try it. I figured if the soup won me over coming out of a can, it would have to be amazing when made with my own two hands.

Unfortunately, I made a few changes to this recipe that I think kept it from being as glorious as I had hoped. The soups flavorings were all delicious, the real problem was with the meatballs. They weren't flavorful and were very tough even though I was careful not to overmix them. Obvioulsy I wasn't careful enough! I also made the mistake of just using ground beef because that was all our grocery store had (yes, I pretty much hate the grocery stores in my area. Whole Foods - why must you neglect us UESiders and position your stores in every other area of the island??). So the meatballs ended up tasting like balled up hamburgers. Less than stellar. This is what I get for messing with Giada!

I will try this one again and actually follow recipe to a "t," because the base of the soup was delicious and very flavorful. It was also really pretty with the green pieces of escarole and little strands of egg and parmesan. In the meantime, if anyone has any meatball tips I would love to hear them!!


Italian Wedding Soup
Slightly Adapted from Everyday Italian - Giada De Laurentiis

Meatballs:
1 small onion, grated
1/3 cup chopped Italian parsley
1 large egg
1 teaspoon minced garlic
1 teaspoon salt
1 slice white bread, crust trimmed and torn into small pieces
1/2 cup grated Parmesan
8-ounces ground beef
8-ounces ground pork
pepper

Soup:
12 cups low-sodium chicken broth
1 pound escarole
2 large eggs
2 tablespoons grated Parmesan, plus more for serving
salt and pepper
cooked macaroni noodles (optional)
  • Meatballs: In a bowl, stir to combine the onion, parsley, egg, garlic, salt and bread.
  • Stir in the cheese, beef and pork.
  • Shape the mixture into 1-inch diameter meatballs and place on a baking sheet.
  • Soup: Heat broth in a large pot over medium-high heat until it comes to a boil.
  • Add meatballs and escarole and simmer for about 8 minutes, or until meatballs are cooked and escarole is tender.
  • Whisk together the eggs and cheese and gradually stir into broth using a fork to create thin strands for about 1 minute.
  • Season with salt and pepper to taste.
  • Add in noodles and top with Parmesan, if desired.

February 4, 2009

The Creamiest Mashed Potatoes Ever!

So, "what makes these the creamiest mashed potatoes ever," you might ask. Because they are very little potato and a boatload of cream! These are not for your typical Wednesday night. They are ridiculously rich and ridiculously good. In the end, there is no semblance of a potato left. They had the consistency of really great grits (you know, the ones loaded with cream and butter - seeing a trend here?). I served these with the ribs in the last post and they were made even more yummy when loaded up with lots of good gravy.

Best part -- no peeling. Just boil the potatoes and garlic cloves in very salty water, send them through the food mill, and add all the bad for you stuff. Boiling the garlic with the potatoes is really a stroke of genius. It gives the potatoes a garlic taste without being overpowering. I think the next time I make these I actually might increase the amount of potatoes just to give it more texture - but if you like your potatoes creamy, this one is right up your alley.


Creamy Garlic Mashed Potatoes

2 pounds Yukon gold potatoes, washed and quartered
4 cloves of garlic, peeled
salt
1 1/2 cups heavy cream
1 stick cold butter, cut into 9 slices
  • Place potatoes and garlic in a pot and add water until potatoes are covered by 1-2 inches.
  • Generously salt the water (Anne suggests tasting it and making sure it tastes like the sea!).
  • Bring the water to a boil and cook for an additional 20-25 minutes or until the potatoes are falling off a fork.
  • Drain potatoes and garlic well and then pass, in batches, through the food mill.
  • Meanwhile, bring heavy cream to boil in a small pot, then remove from heat.
  • Add 1/3 of the cream and butter to the potatoes and mix well.
  • Repeat in 2 more batches with remaining cream and butter.
  • If needed, add salt to taste.
  • Serve, or keep warm by covering with foil and placing in an oven on low heat.

February 2, 2009

Why not keep the Crockpot out?

You probably know by now that I am a big fan of the slow cooker/ crockpot/ working woman's best friend. It's just the easiest thing to cook in and produces phenomenal results with minimum effort. There is nothing better than coming home after a long day to house that is filled with the smell of stewing meat and promises of a delicious dinner. I owe my mom for this little obsession, and I am on a journey to spread the good news! You can imagine how excited I was to happen to pop into my friend's house the other day, only to find her slow cooker (a handmedown from moi) on the counter and obviously being put to good use.

I know many people used their slow cooker over the weekend for the big game, since it is a must for sports parties. So, why not keep it out for dinner this week and make these delicious short ribs. After cooking all day, they are absolutely falling off the bone and tender enough that you could cut the meat with a butter knife. Plus they cook in a wonderful sauce that is chock full of veggies and also makes a fantastic gravy (Brad ate the leftover gravy over rice and even froze some he liked it so much).

Again, this really took minimal effort and you could easily do it before leaving for work (grilled meat - best perfume ever, men will be falling over themselves). I just busted out my big grill pan and seared the ribs on all sides, then dumped them in the pot along with the other ingredients and forgot about it for 8 hours. Presto Changeo - Dinner is served!


Ale-Braised Short Ribs
Slightly adapted from Slow Cooker - Williams Sonoma
Serves 6

4-5 lbs. bone-in beef short ribs
salt and pepper
2 yellow onions, thinly sliced
3 garlic cloves, minced
1 butternut squash, peeled and diced
14.5-oz. can diced plum tomatoes, with juice
12-oz. dark beer
3 tablespoons flour
1/4 cup water
  • Preheat grill pan (or broiler).
  • Grill (broil) ribs, turning once, about 3 minutes per side.
  • Place ribs in slow cooker.
  • Place onions, garlic, squash, tomatoes and beer on top of ribs.
  • Cook for 5-6 hours on high or 7-8 hours on low.
  • Remove ribs and veggies from pot, and cover with foil to keep warm.
  • Skim off any excess fat with a slotted spoon.
  • Turn heat to high, and whisk together the flour and water.
  • Whisk water mixture into sauce and cook for about 15 minutes, stirring occasionally, or until the sauce is slightly thickened.
  • Add salt and pepper to taste.
  • Serve gravy over ribs and veggies (can place everything back in pot if desired).

January 29, 2009

Pear, Apple and Cranberry Crisp

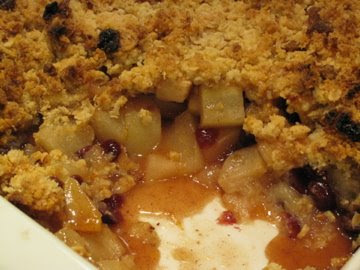
Uuummm... warm fruit and crunchy topping.... I mean is there really anything better on a snowy (i.e. gray slush) day? Ina has done it again! This crisp is so comforting and absolutely delicious. It has beautiful pieces of apple and pear, and tart little bits of dried cranberry. There is also a good deal of cinnamon, which gives it a real warmth, in addition to it being served piping hot out of the oven. As much as I love chocolate (and I LOVE chocolate), this is exactly the kind of dessert I crave when we are camped inside avoiding the wintery weather at all costs. Really, the only thing that got me out of the house yesterday was a trip to Bergdorf's. We gotta support the economy, right?! Thank goodness the sun has decided to show itself today, but the wind is still brutal. 

This is a very convenient dessert to serve when you are having friends over for dinner. Although there is a good amount of peeling and chopping to do, this whole crisp can be prepared before anyone arrives, then just popped in the oven while you are eating dinner. Or you can make it when no one is coming over and cherish the huge tray of leftovers you will be blissfully eating for the next week. Just buy 2 pints of vanilla ice cream. Wouldn't want you to run out and be forced to go to the local bodega to buy ice cream at 2 am in the snow. :)


Pear, Apple and Cranberry Crisp

4 ripe Bosc pears
6 firm apples (Ina suggests Macoun. I used Gala because that was what I had)
3/4 cup dried cranberries
1 teaspoon grated orange zest
1 teaspoon grated lemon zest
2 tablespoons freshly squeezed orange juice
2 tablespoons freshly squeezed lemon juice
1/2 cup granulated sugar
1/4 cup AP flour
1 teaspoon cinnamon
1/2 teaspoon ground nutmeg

Topping:
1 1/2 cups AP flour
3/4 cup granulated sugar
3/4 cup brown sugar
1/2 teaspoon salt
1 cup old-fashioned oatmeal
2 sticks cold unsalted butter, diced
  • Preheat oven to 350℉.
  • Peel and core pears and apples and cut into large chunks.
  • In a large bowl, toss fruit with cranberries, lemon and orange zest and juices, granulated sugar, flour, cinnamon and nutmeg.
  • Pour fruit mixture into a 9 x 12 x 2 inch baking dish.
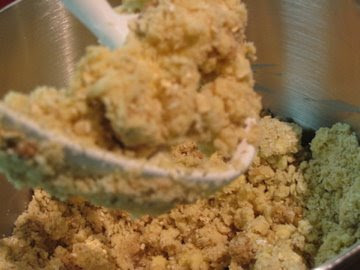
  • Topping: In an electric mixture with a paddle attachment, combine all ingredients and mix on low speed for 1-2 minutes, or until mixture forms large crumbles.
  • Sprinkle topping all over the fruit mixture.
  • Place baking dish on larger baking sheet to catch any overflow, and bake for 50 minutes to 1 hour, or until the top is browned and the fruit is bubbly.
  • Serve warm with a scoop of vanilla ice cream.

January 27, 2009

Irish Onion Soup

I made this the other night when our friends came over for dinner (and some very intense Rock Band sessions!). It's been really cold in nyc for the past few weeks, so soup has never been more appropriate. I'm a big fan of this one because it is a take on a classical French onion soup, but instead the onions are braised in Guinness and the bread topper is smothered in melted Irish cheddar. 

The soup was really flavorful and the cheesy crouton made it substantial enough to serve as a main course. I also love serving things in individual dishes. It just makes for a fun presentation. Unfortunately, I did have a few hiccups with the timing of the recipe. The onions took WAY longer to cook than the recipe called for (they said 15 minutes, I cooked them for like 40 and they still weren't as cooked as I would have liked). Aside from that, and the fact that my eyes are still watering from cutting up so many onions, the soup is a cinch to pull together and everyone seemed to really like it. Especially the men, this is definitely guy food.


Irish Onion Soup

Yields 6 Servings

2 tablespoons extra-virgin olive oil
5 garlic cloves, minced
8 yellow onions, or about 8 cups, thinly sliced
salt
1 tablespoon fresh thyme, chopped
1/4 cup sherry vinegar
1 1/2 cups dark beer (Guinness)
6 cups beef stock
6 slices country break, cute 1/2-inch thick, lightly toasted
1/2 pound Irish cheddar, thinly sliced
  • Heat olive oil in a pot over high heat and add onions and garlic.
  • Season with salt and cook for about 5 minutes, stirring often.
  • Reduce heat to low and continue cooking onions, stirring occasionally, till they are golden brown, about 45 minutes.
  • Add thyme, vinegar and beer and cook until beer is reduced by half.
  • Add beef stock, bring to a simmer, and cook for an additional 10 minutes.
  • Meanwhile, preheat the broiler.
  • When soup is done cooking, ladle servings into individual, oven-safe bowls.
  • Top each serving with the bread and cheese.
  • Broil the soups until the cheese it totally melted and slightly browned.
  • Serve immediately.

January 22, 2009

Easy Winter Salad

I'm not a very big fan of salads as main courses, so when I have them they are usually served on the side of the main attraction or as a starter. This leads me to have some problems with most of the salad recipes out there. You see, there are salads that are ridiculously simple and lack any imagination (or flavor really), and then there are salads that have so much stuff in them that you will be full by the time you are done. 

This is the exact predicament I found myself in when I was planning our little dinner last week. I finally decided to throw together some of the ingredients I thought would go well and dress the salad with one of my all-time favorite dressings. What came together was the perfect salad for a cold night. It's very flavorful but won't leave you too full. I know this isn't much of a recipe, but so many people seem to be on the lookout for tasty salads I thought I would share.


Easy Winter Salad

Toasted Walnuts
Parmesan Curls
Pear, medium diced or sliced
Pre-Washed Mixed Greens
Salt and Pepper
Ina's Vinaigrette (recipe below)

Combine all ingredients, except for dressing, in a bowl. Toss with desired amount of salad dressing right before serving.


1/2 cup Olive Oil
1 tablespoon Red Wine Vinegar
1/2 teaspoon Dijon Mustard
1/4 teaspoon Honey
1 teaspoon Salt
1/4 teaspoon Pepper
1 tablespoon minced Shallot

Place all ingredients in a small bowl and whisk together, or shake to combine in a salad dressing carafe. Dress salad just before serving.

January 20, 2009

Fancy Schmancy

After too many nights of easy to prepare comfort food, I was feeling ready to tackle something a little bit more challenging this weekend. So I planned this lovely dinner for Brad and I, complete with all our fancy china and crystal (thank-you wedding guests!). The star was rack of lamb, served with roasted tomatoes and potatoes. It was delicious!! And really not hard at all, which totally shocked me because lamb just seems like restaurant food and not something that would be all that good when cooked at home. I don't mean to toot my own horn or anything, but this lamb was just as good as many of the places we've been to, and even better than others.

All you have to do is brown the lamb, then rub it with a delicious garlic, herb and olive oil mixture. Then you roast it in the same pan over potatoes that crisp up nicely in the oven and get all those savory lamb juices. At the same time, you roast up some tomatoes with the same garlicy mixture. The whole thing looks and tastes amazing. If I hadn't cooked it myself, I swear I would have believed that it came from the cute little french brasserie down the street.

This would make the most beautiful Valentine's Day dinner for the person you love - or for your pal who has nothing to do on the 14th either. To complete the entire meal, we started with a 1/2 bottle of champagne (a habit we happily picked up while in France after noticing that many patrons ordered a glass of bubbly while they were perusing the wine list), had a lovely salad to start (which I will share with you later this week), and sipped a beautiful Cabernet-Sauvignon that had been recommended to accompany the lamb. If serving on the big V-day, I would definitely advise to not skimp on the bubbly or vino. :)


Provençal Rack of Lamb with Roasted Tomatoes
Adapted from Gourmet Magazine - October 2008
Serves 2

2 Garlic Cloves
Salt and Pepper
2 tsp chopped Thyme
1 tsp chopped Rosemary
3 Tbsp Olive Oil
2 medium Tomatoes
1 (1-lb) frenched Rack of Lamb, cut in half
2 medium Shallots, thinly sliced
2 medium boiling Potatoes, peeled and sliced 1/4-inch thick
2 Tbsp Water
  • Preheat oven to 400℉.
  • Mash garlic to a paste with 1/2 tsp salt and 1/2 tsp pepper, using the back of a knife.
  • In a small bowl, combine paste with the chopped herbs and 1 Tbsp of oil.
  • Half tomatoes and place inside a small, oiled baking dish.
  • Drizzle 1/3 of garlic mixture on top of tomatoes, and roast for 30 - 40 minutes, or until tomatoes are tender.
  • While tomatoes are cooking, pat dry the lamb and season with 1/4 tsp salt and 1/4 tsp pepper.
  • In a skillet over medium-high, heat the olive oil until it begins to shimmer.
  • Brown lamb on all sides, for about 1 minute per side, or 4-6 minutes total.
  • Place lamb aside and discard any excess oil in the pan.
  • Heat remaining Tbsp of oil over medium heat and add shallots and potatoes.
  • Cook until potatoes start to get slightly brown on the edges, 3-5 minutes.
  • Stir in water and half the remaining garlic mixture and turn off heat.
  • Rub remaining garlic mixture on the fat side of the lamb, and place, fat side up, on top of potatoes and shallots in pan.
  • Roast for about 20-25 minutes for medium-rare, or until lamb is at 130℉ (careful not to touch the bone).
  • Place lamb on cutting board and cover loosely with foil for 5-10 minutes.
  • Serve with tomatoes and potatoes.

January 14, 2009

Breakfast Granola

First off, I want to thank everyone so much for all of their well wishes. I am feeling much better and am excited to be rejoining the world outside our apartment! All of your cheers really helped and I appreciate everyone taking the time to leave a comment. Now on to my latest and greatest...

I have yogurt, fruit and granola for breakfast almost every morning after my run. It's a hearty enough breakfast that I'm left feeling full until lunch, and also gets in lots of healthy fruit, protein and fiber. I also can't stomach a huge breakfast right after a run, so something light but filling, like this granola, is the perfect start to my day. If you are looking for a healthy breakfast that doesn't feel healthy, please try this combo. No, it's not a stack of pancakes. But when mixed with yogurt, it is sweet, crunchy, creamy and really delicious.

This is my favorite morning granola recipe because it is sweet without any additional sugar and is crunchy without being break-your-teeth hard. The addition of the dried fruit also makes it colorful and adds an extra flavor punch. It's also quick and painless to put together and you won't be left washing dishes for hours afterwards, which means you might actually be inclined to make this every few weeks. It will keep nicely if stored in an air-tight container at room temperature for 1-2 weeks. You could freeze it as well.

I just saw that Grace, over at A Southern Grace, has posted a little contest for recipes containing cinnamon in them, so I'm sending this her way. The cinnamon in the granola adds a really nice bit of spice and flavor without any additional calories. Be sure to check out her awesome blog and enter a recipe yourself!


Breakfast Granola

3 cups Rolled Oats
1/2 cup Unsalted Hulled Sunflower Seeds
1/2 cup Flaked Coconut
1/4 Wheat Germ
1 1/2 cups chopped Unsalted Mixed Nuts (I used pecans, walnuts and almonds)
1 teaspoon Cinnamon
1/2 teaspoon Kosher Salt
4 tablespoons Unsalted Butter
1/3 cup Pure Maple Syrup
1 teaspoon Pure Vanilla Extract
2 tablespoons Water
1 cup chopped Mixed Dried Fruit (I used raisins, prunes, strawberries and apricots)
  • Preheat oven to 350℉.
  • Combine first 7 ingredients in a large bowl.
  • In a small sauce pan, over low heat, melt the butter into the maple syrup.
  • Stir vanilla into syrup, and pour over the oat mixture.
  • Add water and stir until well combined.
  • Spread granola out on a large baking sheet, making sure the edges are not thinner than the middle (the edges will tend to burn if they are too thin).
  • Bake for 25-30 minutes, stirring the granola at 8 minute intervals, or until golden brown.
  • Allow granola to cool completely in the pan, then stir in the chopped fruit.

January 11, 2009

Enchiladas with a side of pain killers, please.

So I underwent a a fun little surgery last week that has had me either tied to the bed or in a pain-killer-induced fog for what seems like forever now. What a way to ring in the new year! Since I haven't been able to stand for long and have no appetite there has been a sudden lack of home-cooked food coming from our kitchen. Brad has been taking good care of me and the man sure knows how to work the take-out menu! But all this has me really aching to get back in the kitchen and make something that didn't come to our door in 30 minutes or less. I'm also dying to go for a run but that looks like it ain't happening for a while. I never thought I would be envious of all the new year's gym slaves.

I've had this recipe on hand for a while as it's an old standby for me. I mean who doesn't love enchiladas? The cheese, beans, and red sauce all make this a home run. It's quick and easy (seems to be a theme for me lately - I promise to try something a little more challenging once I'm back to my normal self), and can be on the table in under 25 minutes. This is yet another one of those meat-free dinner options with a few low-fat additions, so you can feel assured it won't reck any resolutions you might have made a week ago.


Cheese and Bean Enchiladas
Adapted from Cooking Light

3/4 cup finely chopped Onion
1 16-oz. can fat-free Refried Beans
2 cups shredded reduced-fat Mexican Blend or Cheddar Cheese
6 Corn Tortillas (taco sized, or 12 fajita sized)
1 19-oz. can Enchilada Sauce
2 tablespoons low-fat Sour Cream
6 tablespoons minced fresh Cilantro
  • Preheat oven to 400℉.
  • Saute onions in a pan over medium heat for about 5 minutes, or until softened.
  • Combine cooked onions and refried beans in a microwave safe bowl and microwave on high for 3 minutes (or until heated).
  • Stir in 1 1/2 cups of cheese.
  • Place tortillas in a pile surrounded by damp paper towels and microwave on high for 1 minute, or until soft.
  • Pour half the enchilada sauce into a 13 x 9-in. baking dish.
  • Coat the tortilla shell in the sauce on both sides, then spoon bean mixture (about 1/4 cup amount) down the center.
  • Roll tortilla and place tightly in baking dish.
  • Continue until dish is full.
  • Top with remaining sauce and cheese.
  • Bake for 8 minutes, or until completely heated.
  • Serve individual enchiladas with sour cream and cilantro.

January 6, 2009

Eggplant Gratin

It seems like everyone is beginning their New Year's Resolutions and attempting to eat healthier, so I thought I would share this recipe for Eggplant Gratin. It's not necessarily healthy given all the cheese, but it doesn't have any meat, which is a start, right? I'm not the biggest "healthy" meat fan - chicken and pork are blah unless they are covered in some kind of yumminess like cheese or BBQ sauce. The only meats I really swoon over are beef and sausage. Not exactly the right choices to start 09 off on the right foot. So I give you a meatless entree that is satisfying enough to let you go veggie for a night without ever missing the meat. And it sure as heck tops a baked chicken breast!

This has layers of eggplant, tomato sauce and cheese, all baked in together until warm and bubbly. It's kinda like lasagna, but much cutter since it is baked in individual gratin dishes. The one aspect I wish this had was a bit of a crunch. I think next time I might add some bread crumbs to the top just to give the dish something more to bite into.

Hope everyone is off to a great 2009, and is enjoying the calm after all the holiday hoopla!

2 Servings

Olive Oil
3/4 pound Eggplant, unpeeled, sliced 1/2-inch thick
1/4 cup Ricotta Cheese
1 extra large Egg
1/4 cup Half-and-Half
1/2 cup and 2 tablespoons grated Parmesan
Kosher Salt and Pepper
1/2 cup bottled Marinara Sauce
  • Preheat oven to 400℉.
  • Heat a large frying pan over medium and lightly coat in olive oil (about 1/8-inch).
  • When oil is on the brink of smoking, add several eggplant slices and cook, turning once, until lightly browned on both sides (about 5 minutes).
  • Drain eggplant slices on a paper towel-lined plate.
  • Repeat this process until all eggplant slices have been cooked.
  • While eggplant is cooking, mix together the ricotta, egg, half-and-half, 1/4 cup Parmesan, 1/8 teaspoon salt and 1/8 teaspoon pepper.
  • Place 2 individual gratin dishes on an aluminum foil lined baking sheet.
  • To assemble each gratin: place a single layer of eggplant, sprinkle with Parmesan, salt and pepper, and half the marinara sauce. Add another layer of eggplant, salt and pepper, half the ricotta mixture, and top it all off with another sprinkle of Parmesan.
  • Bake for 25-30 minutes, or until nicely browned and filling is set.